

RESOURCE GUIDE
How to use the World Kidney Cancer Day Canva video template to make and share testimonial videos featuring a local patient
When raising awareness of important health issues, few things are as powerful as sharing authentic patient testimonials on social media. As you know, the theme of World Kidney Cancer Day 2026 is ‘Kidney Cancer and Emotional Wellbeing’. To help our partners enhance their local campaigns, the International Kidney Cancer Coalition (IKCC) has created an easy‑to‑use Canva video template that allows organisations to produce short testimonial videos in their own language, which they can use on their websites and post on social media.
The template contains opening and closing titles and frames each of the interview questions. You simply record a short interview with a patient, upload the video to Canva, and place the answers into the template to create a 1–2 minute video ready to post on social media. The template also allows you to add your own organisation’s logo so the video clearly reflects your local organisation and campaign activity.
Short patient testimonial videos can be one of the most powerful ways to raise awareness about kidney cancer and emotional wellbeing. Even simple recordings made with a smartphone can have a strong impact when they share a genuine patient experience. We hope this guide helps you create compelling stories that strengthen your World Kidney Cancer Day campaign in your local community.
1. Find a patient (or patients) to interview
- Consider speaking with several patients to identify someone comfortable sharing their experience in respect of kidney cancer and emotional wellbeing. A relaxed and genuine conversation will always create a stronger video than a highly scripted answer.
- If you cannot film in person (e.g. if your interviewee is on the other side of the country), recording on Zoom or Microsoft Teams is a good alternative.
2. Recording using Zoom or Microsoft Teams (skip if recording in person)
Preparation:
- Schedule your meeting and ask if the patient would like to see the questions you will be asking in advance. Some may like that, others will be happy to just hear them on the day.
- Ask your interviewee to join with their camera switched on.
- Ask them to sit somewhere quiet with good lighting and a stable internet connection.
- In Zoom, switch to “Speaker View” so the main speaker fills the screen.
- Ask the patient to remain the primary speaker while answering questions.
- In Zoom settings, you can enable “Record active speaker” so the video stays focused on them.
Starting and stopping recording:
- In Zoom: click “Record” at the bottom of the meeting window.
- In Microsoft Teams: click “More actions (…) > Start recording”.
- Allow the interview to continue naturally while recording.
- When finished, click “Stop Recording”.
- The recording will automatically save to your computer or cloud storage.
3. Recording in person
- You can use either a smartphone or a digital camera with video mode. In either case, a tripod will help keep it steady while you film.
- Set up in portrait mode (upright framing) rather than landscape (like a TV), as your finished video will be for mobile. You can shoot in video and change the crop of your video later but it’s easier to shoot it portrait framing in the first instance.
- Ideally there should be little or no background noise, so be aware of a TV being on, dogs barking or drilling next door.
- Make sure there is enough light on your subject’s face. If there is a strong light source such as a window behind them, they may appear in silhouette, which you don’t want. Do a quick test. If there is not enough light on their face, point a table lamp towards them from behind your camera position.
- Ensure that they are sitting comfortably and feeling relaxed and set yourself up with a chair right next to the camera, so you can ask the questions from there and have a natural conversation.
4. The interview itself
- Sit comfortably, have the questions on a piece of paper in front of you, and look at your interviewee while they answer, nodding and maintaining eye contact as you would in a natural conversation.
- Do not talk over them, leave a gap before asking the next question and ask them to leave a gap before answering.
- Keep the interview relaxed and conversational. Natural answers will feel more authentic for viewers.
- You may record several attempts at each question and select the best answers later during editing.
5. Set up Canva account
A basic Canva account is free and is all that is required to use this video template. Registered non-profit organisations can also apply for a free CanvaPro account through the Canva Nonprofits programme. Apply here.
Step‑by‑step setup for a basic account:
- Go to Canva
- Click “Sign up” in the top right corner.
- You can sign up using an email address, Google account or Facebook account.
- Once registered, you will arrive at your Canva homepage.
- With your Canva account created, click on the link below to make a copy of the Video Testimonial template:
6. Uploading your video interview into the Canva template and editing
Tip: If at any point you make a mistake during editing, click the undo button along Canva’s top toolbar, or click CTRL+Z (Windows) / CMD+Z (Mac). You can also use the useful links at the end of this section for tutorials and extra guides.
With your video testimonial template open on Canva, spend a few minutes orientating yourself:
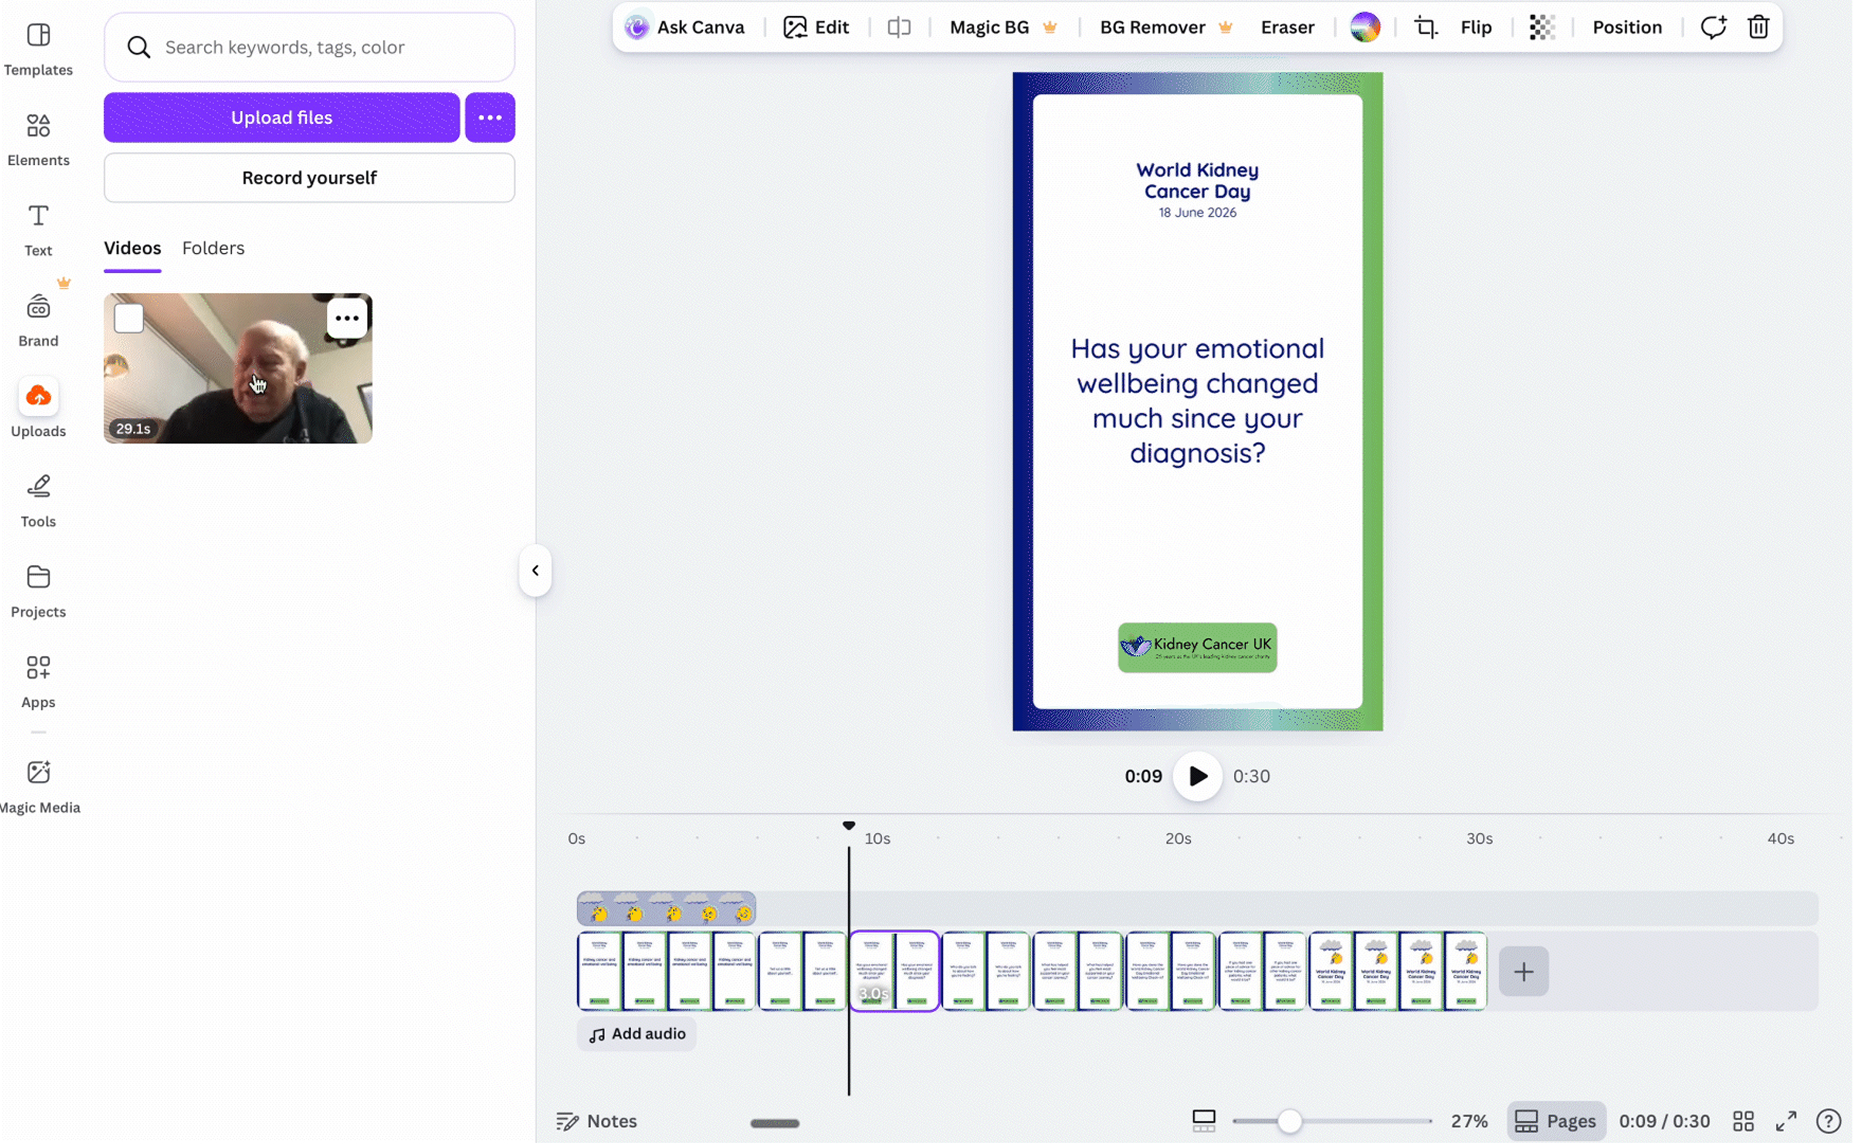
- On the left, you’ll see a menu-bar: This will be what you’ll use to upload and add your recorded interview.
- On the very top, you’ll see Canva’s navigation bar: This is where you can access your profile from, and download your finished video.
- On the bottom, you’ll see an editing timeline with all the question slides already added: We’ve prepared this for you, so all you have to do is add, trim, and edit your recorded interview files.
- In the middle, you’ll see the video preview: This is what you can use to watch your video before downloading, and see how it looks and sounds.
Step 1: Upload your video
- Click “Uploads” in the left menu.
- Select “Upload files” and upload your video.
- You should now see your video file on the left.
Step 2: Edit and trim your video clip
- Drag-and-drop your video file from the left onto the editing timeline. Ideally after the first question slide, but anywhere is fine for now.
- Use the “Trim” handles at the start and end of the clip to isolate the first answer—remember, you don’t need your question; you only need the interviewee’s answer.
- If the video was filmed horizontally, click “Crop” on the floating tool bar above the video preview (to the left of “Flip”) and adjust the frame so the patient remains centred.
- With the video trimmed and cropped correctly, drag-and-drop it to directly after the first question.
- Now, repeat the above for each answer. If you want to skip a question, select the answer slide, and delete it.
Here is a quick demo on the above:
Fine-tuning
- Remove long pauses to keep the video engaging.
- Ensure the total length is around 1–2 minutes.
- If desired, add your organisation’s logo using “Uploads” or “Brand” tools, and drag-and-dropping into above the answer slides. You can then resize and move it around. Remember: You’ll need to adjust the length to match the length of the question slide, and repeat for each question.
7. Downloading from Canva and posting on social media
- Click “Share” in the top right corner.
- Select “Download”.
- Choose “MP4 Video” as the file type.
- Click “Download” to save the finished video to your computer.
You can now upload the video to your organisation’s social media platforms such as Facebook, Instagram, LinkedIn, or X. When posting, remember to include the World Kidney Cancer Day hashtag and tag IKCC where possible.